D-Bus experiments and utilities

I wanted to try some simple Bluetooth programming on Linux, but since the modern way to do this in Linux is through D-Bus, I had to learn about that as well. D-Bus is a high-level way of communicating between processes. The D-Bus protocol is not fixed to a certain programming language, and there exists implementations or bindings for several languages. I did my experiments using Python and its dbus-python module. Even though it is said that the module is obsolete, it still works, and its GitHub repository is still being updated.

D-feet is a nice GUI program can that be used to browse the D-Bus service hierarchy and call methods of objects. In D-Bus a program can offer services, and a service can export objects (that can themselves form a hierarcy), and the objects can implement interfaces, which can have callable methods and emittable signals. All these can be easily explored with D-feet. What is hard with D-feet, however, is answering questions like: which services offer objects with a certain interface. For example, which objects implement the ObjectManager interface. Finding out this using D-feet would mean clicking through all services and objects, and check which interfaces they implement. So, it is not really doable in D-feet.

I have made a Python script than can answer queries like these. Here’s how to make this query with my script:

./query.py --interface org.freedesktop.DBus.ObjectManager

The output shows all services with a well-known name (that is, names that don’t start with a colon) and the respective objects on the system bus that implement this interface.

org.freedesktop.ModemManager1
	/org/freedesktop/ModemManager1
		org.freedesktop.DBus.ObjectManager
org.freedesktop.NetworkManager
	/org/freedesktop
		org.freedesktop.DBus.ObjectManager
org.bluez
	/
		org.freedesktop.DBus.ObjectManager
org.freedesktop.UDisks2
	/org/freedesktop/UDisks2
		org.freedesktop.DBus.ObjectManager

In the above output the toplevel strings are the services, on the next level are the objects, and the interfaces are at the lowest level. There a several options for the query.py program, see the README file in my repository. The next example queries all objects belonging to the service org.bluez that implement the Bluetooth low energy generic attribute profile characteristic interface:

./query.py --service org.bluez --interface org.bluez.GattCharacteristic1

In that repository there are two other trivial DBus scripts that serve as examples of dbus-python programming.

So far, dbus-python library has worked for me well, but a more modern and maintained Python module could be dasbus. I haven’t tried it yet myself.
Yubico Yubikey and PAM

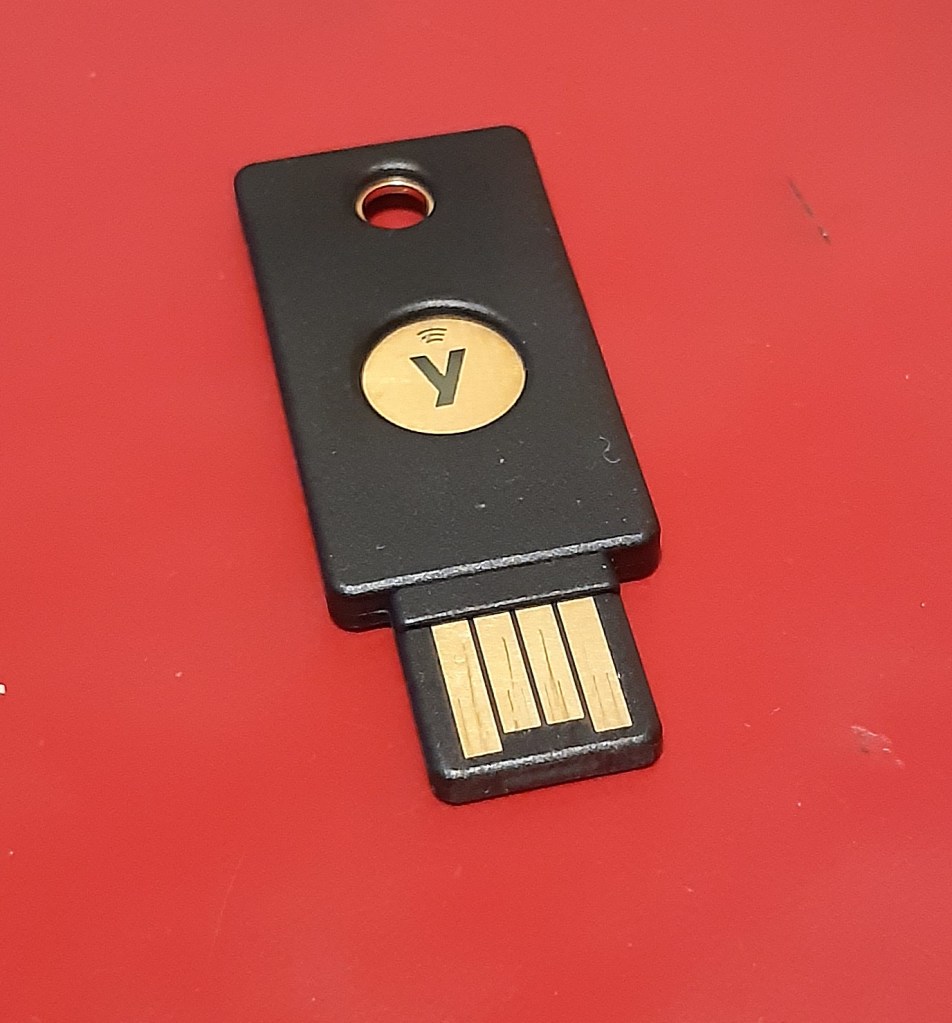
I just purchased a Yubico Yubikey 5 NFC, a hardware authentication device that is plugged into a USB port. It can be used for signing in to your own machice or some web services such as GitHub. Often it is used as part of a multi-factor authentication scheme, so for instance signing in would require both the key to plugged in and a password entered. The Ubikey supports static passwords, one-time passwords and Universal 2nd Factor authentication, among other features. The Yubikey acts as a USB keyboard that automatically enters a password or other response for the user, when the button on the device is pressed. This allows using it without any installed drivers, since USB keyboards are often supported by default.

So far I have only tried using it for logging in on my own Linux machine with Ubuntu 20.04 distribution. This required installation of a few software packages and configuring PAM (Pluggable Authentical Modules) to support it. First I installed Yubikey manager with sudo apt install yubikey-manager. It contains the program ykman. You can ask for the basic information of the Yubikey by issuing command ykman info when the device is plugged in. Next, since I wanted to test the Universal 2nd Factor authentication feature, I installed the relevant packages with command sudo apt install pamu2fcfg libpam-u2f.

The U2F authentication is a public key based method, and in this case the private key is stored in the Yubikey and the public key is placed into a database either system-wide or for each user who wants to use the Ubikey. We try this for a single user, and add the public key to the database in file ~/.config/Yubico/u2f_keys. This is achived with the following commands

mkdir -p ~/.config/Yubico
pamu2fcfg > ~/.config/Yubico/u2f_keys

The u2f_keys file works similarly as the authorized_keys file of ssh, and can contain multiple keys, each on its own line. Note that the user must belong to group plugdev to be able to run the pamu2fcfg command. Next, we will configure PAM to allow signing in with the Yubikey.

Configuring PAM isn’t easy. It has multiple features and its syntax is complex. By misconfiguring it, it is easy to make the system totally open. Or totally closed, so that you have locked yourself out. It is a good idea keep a terminal window open with root logged in so that you can revert your changes to the configuration in case something goes wrong. Make sure that you can use su, sudo, etc before closing the root terminal window. If you still manage to lock yourself out, boot the machine with a live USB stick, and revert the PAM configuration.

With PAM you can define how the authentication works with programs like su, sudo and gdm. To make sure we won’t lock ourselves out, let’s try to modify configuration only for su, since I use that one rarely, and thus it won’t make the whole system unusable is misconfigured. Edit the file /etc/pam.d/su and line the following line just before the line which says @include common-auth

auth sufficient pam_u2f.so cue nouserok origin=pam://barrett appid=pam://barrett

Above, barrett is the name of my machine. This setting allows logging in with su either by touching the Yubikey if the device is plugged in, or if it isn’t then to log in the user must provide a password. This isn’t multi-factor authentication: to use it instead, you should change the sufficient part to required. The cue option causes the prompt “Touch the device” shown to the user. The option nouserok means that this line is ignored, if the Yubikey isn’t plugged in user is not found inside the authfile (u2f_keys) or the authfile is missing or malformed. Don’t use the nouserok option!

This is only fraction of what can be done with Yubikey and PAM. To modify PAM configuration, you should really read and understand the PAM manual pages, for instance pam(7), pam.conf(5), pam_unix(8) and pam_u2f(8). Further information about using Ubikey on Linux can be found from the archLinux wiki.

PipeWire and MIDI on Ubuntu 20.04

I sometimes use my external MIDI keyboard and Qsynth to play some music. I got it working, but it wasn’t trivial. An additional problem is created because using MIDI on Linux requires using Jack, which does not work together with PulseAudio. It would be nice to listen to music, for example, from YouTube and to play on top of it using the MIDI keyboard. Normally Firefox uses PulseAudio to play music, therefore this does not work. The Mplayer music player allows Jack output, so this can be used for background music. But this still requires turning Jack off after I’m finished with MIDI stuff and want to continue with normal use (Firefox etc).

The new PipeWire system aims to combine the properties of PulseAudio and Jack, which would make the audio use on Linux much easier. It also provides compatibility layers for PulseAudio and Jack, so the old applications should work automatically. Since PipeWire is quite new and still under active development, there isn’t an automatic support for it in Ubuntu 20.04. But there is a PPA which provides up-to-date PipeWire packages, for Ubuntu 18.04 and above. I set PipeWire up using these instructions.

It started to work immediately on the usual applications with no problems, but when I tried to use the MIDI keyboard and Qsynth, the applications (Firefox, qjackctl, Qsynth) froze and had to be restarted. Some even had to be killed with the kill -9 command. In more detail, the Qsynth reported the following error: fluidsynth: error: Help! Lost the connection to the JACK server. And in the /var/log/syslog I got the following messages:

Jul 17 14:35:27 barrett pipewire-media-session[2737]: error id:0 seq:16594 res:-32 (Broken pipe): connection error
Jul 17 14:35:27 barrett systemd[2728]: pipewire.service: Main process exited, code=killed, status=9/KILL
Jul 17 14:35:27 barrett systemd[2728]: pipewire.service: Failed with result 'signal'.

And after this the pipewire.service got restarted automatically, but it wasn’t working until I restarted all the needed applications. By the way, the following command can be useful in checking what services are running, and when they were started: ps -O start $(pgrep "jack|synth|pipe|pulse")

On my functioning system it gives the following output:

ps -O start $(pgrep "jack|synth|pipe|pulse") 
    PID  STARTED S TTY          TIME COMMAND
   2738 08:57:07 S ?        00:12:05 /usr/bin/pipewire-pulse
   7769 11:15:11 S ?        00:00:06 /usr/bin/jackdbus auto
  13883 15:04:30 S ?        00:10:14 /usr/bin/pipewire
  13884 15:04:30 S ?        00:00:00 /usr/bin/pipewire-media-session
  14839 15:11:09 S ?        00:02:26 qjackctl
  14848 15:11:18 S ?        00:02:39 jack-keyboard
  14858 15:12:05 S pts/1    00:04:17 jack_midi_dump
  14862 15:12:38 S ?        00:02:09 qsynth

The applications which try to use PulseAudio will actually use pipewire-pulse and Jack application will use jackdbus, which will get started automatically by qjackctl.

I will now advance step-by-step to make sure MIDI input works, and then I will check that the sound synthesis will work. And I will show the settings of relevant applications.

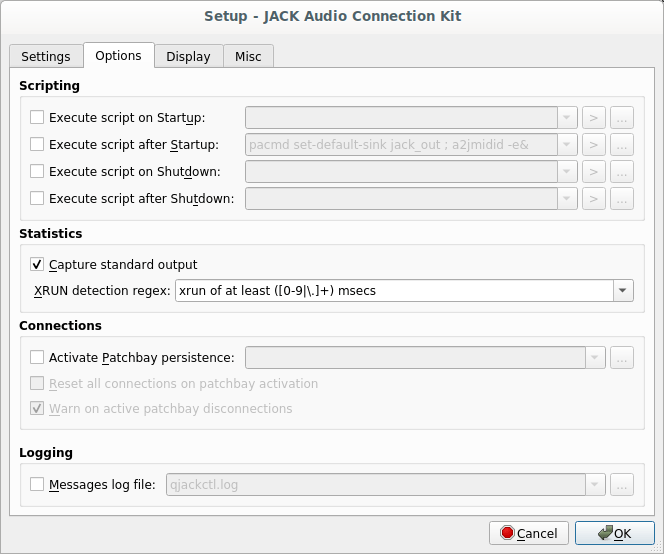
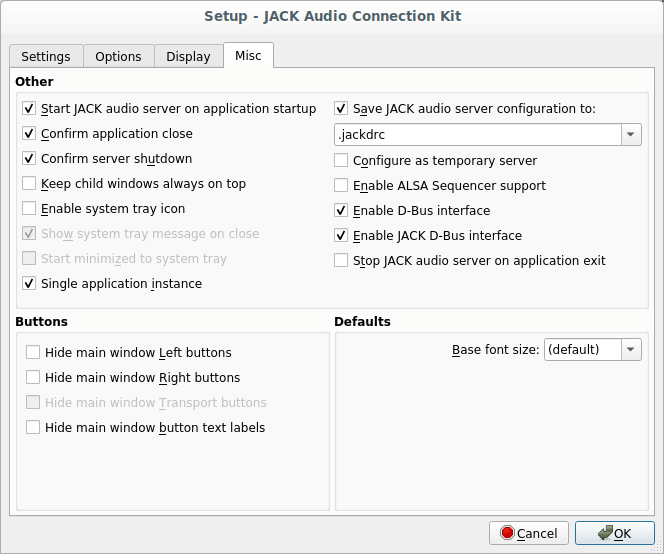
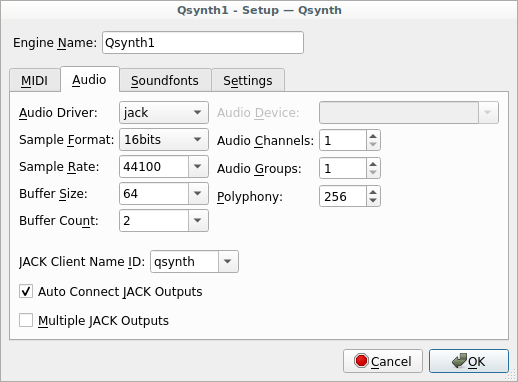
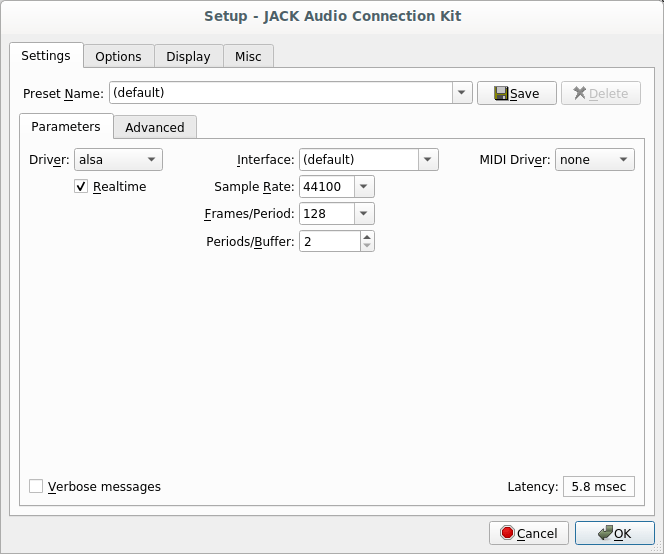
I use the jack-keyboard program to emulate a MIDI keyboard, so that I can generate MIDI commands. To monitor these MIDI commands, I will use the jack_midi_dump program. First however, start the qjackctl program, and check that the settings are as in the following figures.

In the below figure, note that I have disabled the “Execute script after Startup” command. It was needed previously to map ALSA style MIDI to Jack MIDI using a2jmidid. But now PipeWire does this automatically, so the setting is simpler.

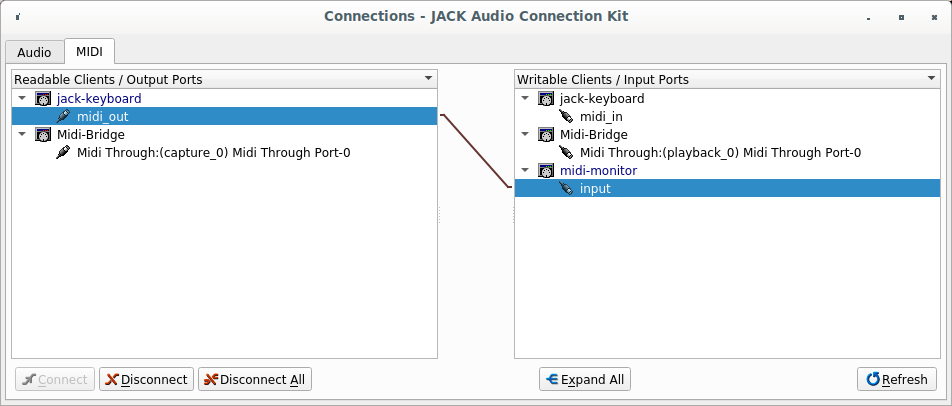
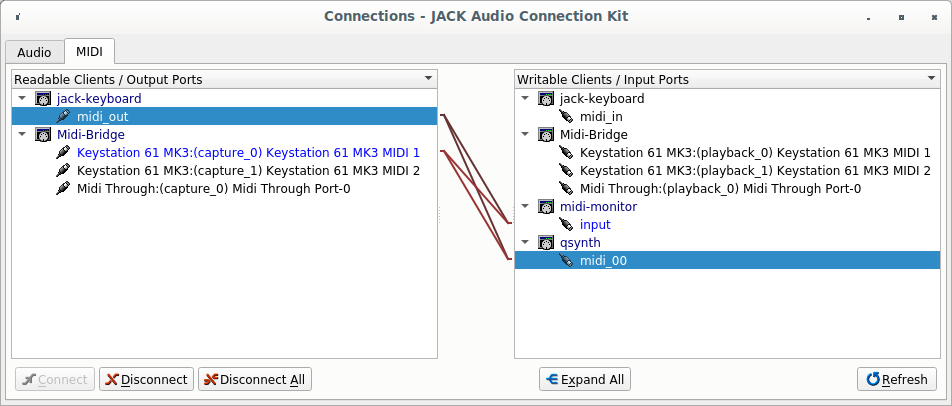
After the qjackctl settings are correct, start the jack-keyboard and jack_midi_dump (a command line program), and make the following connection in the qjackctl:

Now, if you click a key on the virtual keyboard of jack-keyboard, the note information should be shown in the terminal window of jack_midi_dump. Now that this works, you can try connecting your external MIDI keyboard to your computer and make the connection in qjackctl between the keyboard and the midi-monitor. Again, the notes should be shown in the terminal window. So, the MIDI input seems to be working.

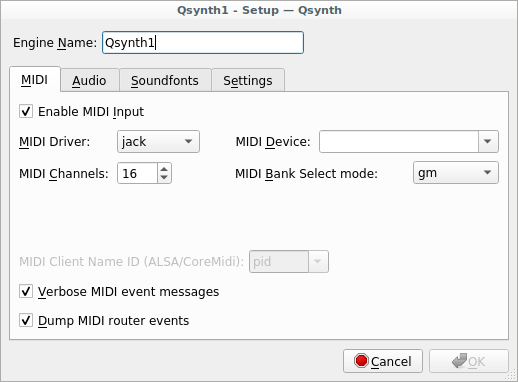
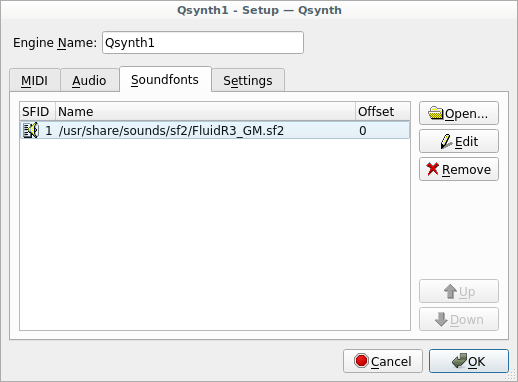
Next, we set the sound synthesis based on the qsynth program. Make sure the setup of qsynth is as shown in the below figures:

Note that above I previously had “alsa_seq” as the MIDI driver, but immediately as I switched this setting to “Jack”, the system no longer froze.

Now restart qsynth and connect in qjackctl a MIDI keyboard to the qsynth like in the below figure.

Now both the virtual and external MIDI keyboards should show note information on the jack_midi_dump and a sound should be played by qsynth. Note that even though the settings I described above work for me they may not be the optimal ones.

Note: always start qjackctl before starting qsynth, jack-keyboard or attaching an external MIDI keyboard. Conversely, before stopping a program or detaching an external MIDI keyboard, disconnect the connections from/to the program/device. Otherwise the programs may freeze and the volume control from the (computer’s) keyboard or from the desktop panel no longer works. This is however a minor defect compared to the earlier non-PipeWire system, and I will definately continue using PipeWire.

Command line tools for binary files

The tools of Unix command line are usually meant for processing line oriented text. Some of those tools can however also handle byte oriented content. In this post I go through some simple use cases. For more complicated uses, hex editors or self-made tools can be more appropriate.

Let’s first create two example files:
echo -n 1234567890 > file.bin
echo -e "12345678901234567890\n12345678901234567890" > file2.bin

The default format of od is octal, which is not really used anywhere anymore except maybe in unix file rights. To get the more common hexdump use
od -A x -t x1z -v file.bin
Since this is a bit hard to remember, one can use hexdump instead:
hexdump -C file.bin
Even easier is the hd alias for this hexdump call
hd file.bin

The following commands convert binary bytes to text form. To create a list of hexpairs use:
hexdump -v -e '/1 "%02x "' file.bin ; echo
To create a list of decimal bytes use:
hexdump -v -e '/1 "%i "' file.bin ; echo

The following commands convert text to binary bytes.
echo 414243 | xxd -p -r
In the above spaces can also be used to separate the hexpairs.

To get first 5 bytes of a file, use
head -c 5 file.bin
and correspondingly
tail -c 5 file.bin
gives the last 5 bytes of a file. To get all but the last 5 bytes, use
head -c -5 file.bin
To get all bytes starting from the 5th byte, use
tail -c +5 file.bin
An example use case might be removing a byte order mark from the beginning of a file with
tail -c +2
The last two cases show that head and tail don’t work in completely symmetric way. I don’t know why it was done like this. For a range of bytes, use dd. The modern versions of it can support efficient byte level access instead of block level access. For example, to get byte range [3,6], use:
dd iflag=count_bytes,skip_bytes count=4 skip=2 < file.bin 2> /dev/null

The tr command allows filtering and conversion of bytes. To replace character 2 with byte \x20 (space), use:
tr 2 $'\x20' < file.bin
The tr program only allows specifying a byte literally or with an octal code (e.g. \123), hence the bash feature of specifying bytes in hex is used above.

iconv can be used to convert text from one format to another. For example, one can convert utf8 text to four-byte little-endian Unicode with:
echo αβγ | iconv -f utf8 -t UCS-4LE | hd

The grep program can be used to search for bytes.
The following command will search for byte pairs that
will begin with either byte \x31 or \x32
grep -bUPo "[\x31\x32]." file2.bin
Unfortunately, as usual, grep does not allow overlapping matches,
so the above is not completely satisfactory.
The options used above have the following meanings:
option -b causes the offset of matches to be printed (0-based offsets),
option -U switches to binary mode, option -P switches to Perl-style
regular expressions, allowing the syntax to specify bytes
in hex notation, and finally option -o causes only the match to be printed,
not the whole line.

Random bytes can be read from the device /dev/urandom:
head -c 5 /dev/urandom | hd
One can also create random bytes with openssl. The following will produce 10 bytes
openssl rand 10 | hd
and the following will output them as hex pairs:
openssl rand -hex 10
And the following will output them in base64 encoding (using only printable characters, allowing to code 6 bits of information per byte)
openssl rand -base64 10
The output of base64 is padded by = characters so that the length of the output is divisible by four.

The following converts the file to C code array and its size:
xxd -i file.bin

Finally I mention some other useful binary tools, also non-command-line tools. Okteta is quite a good GUI based hex editor with many ways to view data and do copy pasting and other manipulation. Radare2 has many tools for handling (executable) binary files, such as disassembler, executable structure viewer, hash tools, binary diffs, etc. The tools of Radare2 are scriptable but can also be used as (text-based) GUIs. t2b is a mini language for generating binary files. It is quite nice, but unfortunately does not allow conversion between different endian formats.

Boost.MultiArray helpers

If one wants to use multi-dimensional arrays in C++, then one option is to use Boost.MultiArray. One of its good properties is that it allows non-zero start indices. For example, one-dimensional multi array could have indices starting from -5 to 5. It is also widely available, since many other software products use Boost, so it is usually installed by default.

The downsides are many. Firstly, it was written nearly 20 years ago, and it shows. It would probably be much easier to use, if it was redesigned for modern C++. Also, the documentation is not exactly well written or pleasing to one’s eye. Have a look at it your self: reference documentation. In addition, if you forget the small code snippets that are isolated from all context, they provide one complete example that is ready to compile. Too bad that it doesn’t compile without modifications. So, more complete examples would be needed.

But so far I haven’t found better option. So, I thought that I would share some of my code that has some working examples, and that also provides tools to make the use of the Boost.MultiArray library a bit easier. The code can be found from my GitHub repository.

The tools include the following functions and classes:

  • print: Prints the multi array in a similar format than Python’s NumPy arrays use
  • info: Shows the exact type of the multi array, element type, number of dimensions, the shape of the multi array, and the number of elements. Note that multi array is a concept that is implemented by several different classes (multi_array, subarray, array_view, …).
  • shape: Returns the shape of the array in string form. Example result could be: “[2][range(1,4)]”, which mean that the first dimension can be indexed either by 0 or 1, and the second dimension can be indexed with 1, 2, or 3.
  • get_extents: Similar to shape, but the result can be passed to the constructor of boost::multi_array to create a new array of the same shape as the existing one.
  • iterator: This class provides a flat iterator over all elements of the multi array
  • construct: This function allows one to create multi arrays from C-style multidimensional array. Either from an existing variable or from a literal multidimensional array.
  • sum: An example of an algorithm that recursively goes through all the dimensions of an array.

The default iterator of an n-dimensional Boost.MultiArray iterates over all its n-1 dimensional subarrays. This is not often helpful. The flat iterator provided here enables easy application of STL algorithms over the elements of a multi array. The iterator also allows quering the indices of the element the iterator is pointing to.

The Boost.MultiArray also offers data() method, which returns a pointer to the underlying raw data. This can be used to implement some algorithms, but it is not very C++ like, and in addition, it does not work for subarrays or array views. But my flat iterator works also for them.

It is very easy to get indexing wrong with multi array, especially when index bases are non-zeros. And even though the Boost library checks whether indices are withing bounds, it does not indicative which dimension was wrong and by how much. Therefore it is very helpful to be able to print the contents of the array (or parts of it) and also show information about array shape and size. In addition, using iterators to go through the elements of the array, avoids buffer overflows.

Using the construct function a literal multidimensional array can be converted to boost::multi_array without the need of specifying the number of dimensions or the shape. These are deduced automatically. The implementation of the function is not very pretty, since deduction of multidimensional array is quite hard in C++. For more details about this, see the following page.

HP Zbook Studio G5

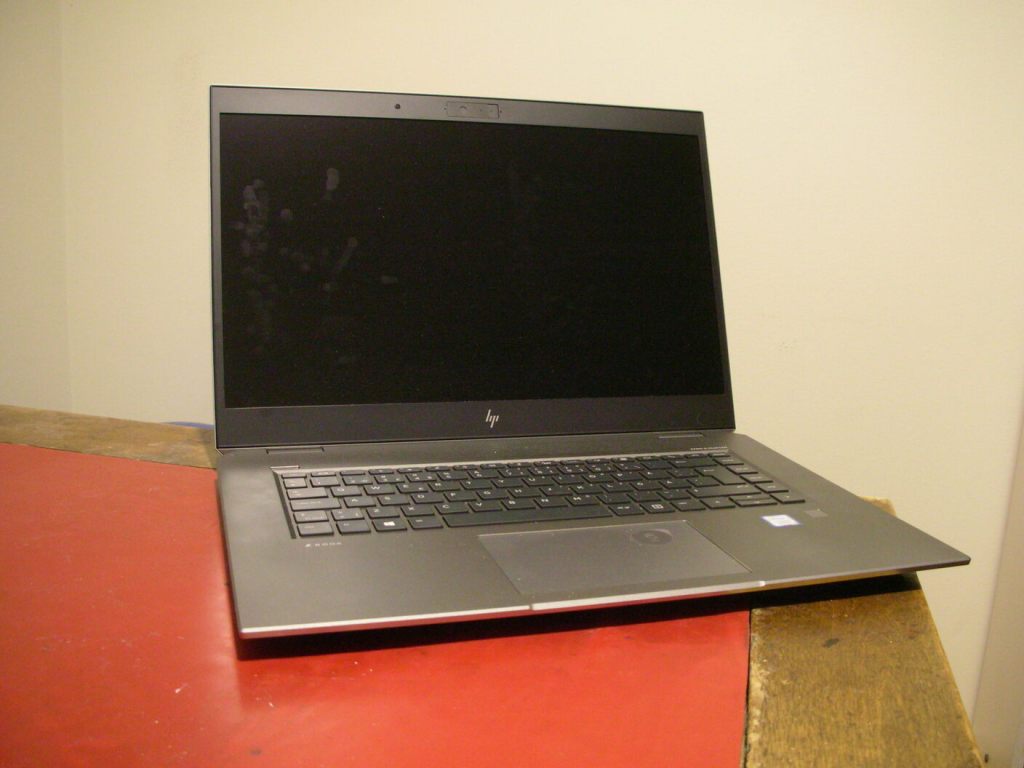
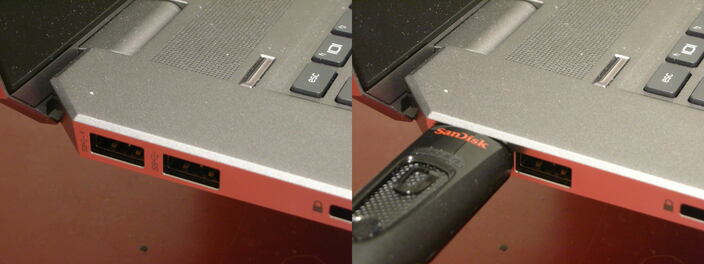
I just bought a new laptop. It features 15.6 inch display, good keyboard, and plenty of processing power. The machine has two USB-A 3.0 type ports and two USB-C ports. However, the USB-A 3.0 ports are too close to each other, so if you plug in an even slightly larger USB memory stick for instance, the other USB-A port becomes unusable.

The machine came with Windows 10 preinstalled, and I installed Ubuntu 19.10 alongside it. I followed the instructions in https://www.tecmint.com/install-ubuntu-alongside-with-windows-dual-boot to decrease the size of the Windows partition and to install Ubuntu. I chose not to allow third-party software.

Therefore, it didn’t install the native Nvidia driver for my Quadro P1000 GPU, but instead used the open source Nouveau driver. This causes much instability, and often the machine locked up already when trying to log in. When trying to load a driver from Nvidia web page, it instructed the use the Nvidia driver from Ubuntu distribution instead. I selected the driver version 435.21. Because my machine uses secure boot, I had to sign the driver (other option would have been to disable secure boot). I created a temporary password, and when booting the machine, I selected the enroll MOK (Machine Owner Key) and gave my temporary password. Then the machine seemed stable and the GPU acceleration worked, for instance, with the Tensorflow library.

Nvidia provides the VDPAU library for hardware accelerated video decoding, and Intel and AMD use the VA-API for decoding. The VDPAU seems to work at least in VLC, mplayer, and mpv, although mplayer support seems to be a bit buggy and does not work out-of-box. Try command line options -vo vdpau and -vc ffh264vdpau,ffmpeg12vdpau,ffwmv3vdpau,ffvc1vdpau, or put them in .mplayer/config file, to get mplayer at least partially working. Firefox, however, does not support hardware acceleration at all.

But the troubles were not over yet. In the Firefox browser there seemed to be horizontal tearing when scrolling a page or when watching YouTube videos. Based on a Google search, this seemed to be a common problem with Linux. I fixed it (or at least got rid of most of the symptoms) using the following procedure. I created the file /etc/modprobe.d/zz-nvidia-modeset.conf and added there the line options nvidia_drm modeset=1. Then I ran the command

update-initramfs -u

and rebooted the machine. Tearing was gone! The previous operations allowed the Nvidia driver to do the setting of video mode, instead of letting Xorg to do it. If all was done correctly, the following command should output Y:

cat /sys/module/nvidia_drm/parameters/modeset

What still does not work is controlling the brightness of the display. Pressing fn+f3/f4 toggles microphone on/off instead of decreasing/increasing brightness. They work in Windows, so this is a Linux specific problem. And a very persistent one, since there has been a constant flow of bug reports from the last eight years at least. For some reason the keys fn+f3/f4/f8 all send the scan code E0 01 when the key was pressed. However, for me it was possible adjust the brightness from under the power controls using mouse, so this is not such a big problem. I can also choose different keys for brightness control from system settings -> keyboard -> short cuts -> system -> hardware, at least in Cinnamon. I chose the pick up phone and hang up phone keys.

Then later I read somewhere that performing a power reset could solve this problem. Essentially, turn the laptop off, remove all cables, and then press and hold down the power button for 15 seconds. Then turn the computer on and reconnect the cables. After this operation the brightness buttons started working. Now they produce the scancodes e0 12 (decrease) and e0 17 (increase):

By the way, you can select from BIOS whether the keys f1-f12 produce the function keys and fn key combined with f1-f12 produce the hotkeys (like adjusting volume or brightness), or vice versa.

The final problem was when changing between virtual consoles the input devices in X seemed to die, although they still worked in the gdm3 login screen. This problem was solved by changing the display manager from gdm3 to lightdm using the command sudo dpkg-reconfigure lightdm.

Create your own website, free on WordPress.com.Create your own website.
Start free